

A bit of history
Matches themselves were invented in 1805 by the physicist J. Chancel. For a long time they were sold without a box. The sizes of matches in those days were larger than now, and they ignited on any hard surface. The first boxes for storing them allegedly appeared in 1833. Initially, the striker was placed inside. This was, of course, not very convenient, and matches in such boxes sometimes ignited spontaneously simply from friction against each other.
Safe matches began to be produced only in the middle of the 19th century in Sweden. They appeared in Russia in the 1880s. Matches delivered from Sweden were initially very expensive in our country; only wealthy people could use them.
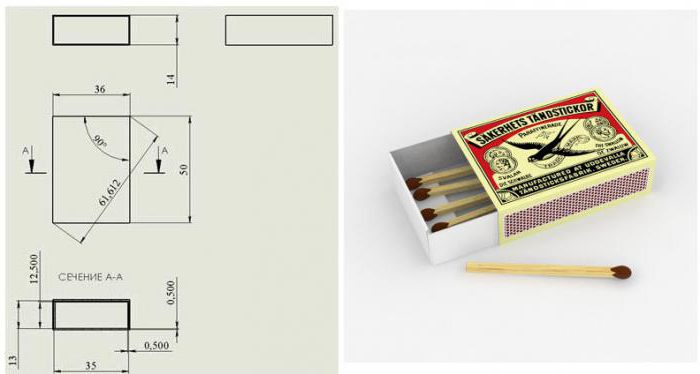
Standard matchbox size
Such products are most often made today from ordinary thick cardboard. Pocket versions of matchboxes, household, fireplace ones, etc. are available for sale. But of course the first type of such cardboard products is most often used.
The size of a standard matchbox is determined by GOST 1820-2001. See the table below for the exact dimensions of this product.
Source
Features of matchbox crafts
Matchbox crafts are easy to make, and to complete one finished work you need several boxes at once. Therefore, after choosing your favorite craft option, you should pay attention to how many pieces are needed for the job.


All boxes must be thoroughly greased with glue, and when fastening, press them for a while so that the sides firmly „grab”.
Potential benefits
We could not ignore a few important points of benefit from this lesson.


If something like this was assigned as homework in a craft lesson, then the sense of responsibility for the need to finish and find a solution grows. We as adults can help our children.

The task of inventing something from a simple matchbox develops ingenuity. In small children, hand motor skills and perseverance are developed.

The materials used are extremely delicate, so you need to work with them carefully.

What to make from matchboxes
Cardboard boxes are great for creating jewelry boxes, toy furniture, volumetric puzzles, holiday crafts and technology projects.


A more complex version of the house
The sophisticated version of the house assumes a more careful approach to details and differs from the simple one in that you have to glue the matchboxes on both sides.
Beforehand, ask the child to first draw a diagram of the house from all four sides on paper, and then plan how many „bricks” you will need. You need to fit the door, window, roof.

It is best to build the walls in this option separately; if there is no window, it is enough to trim the paper protruding from the sides and glue it.
If the wall has a window or door, first make the wall, then lay it on a sheet of paper, trace the opening and cut it out, and then apply glue and place it. The same will need to be repeated for the other side.
A field of inspiration
The creative work of Dutch designer Kim Welling is a box of inspiration. The artist knows: a smile or a few kind words will improve your mood. And if there is no one nearby, a wonderful box containing a funny picture or refreshing inscriptions will save the day. Let it always be there, because it is a great way to cheer up at any moment!

Soul messages in a box


Valentines
A Valentine’s card – a matchbox is a budget gift that evokes additional emotions due to the fact that it was made with your own hands:
- Cover the matchbox on all sides with wrapping paper in the chosen color so that the moving part remains movable.
- In the upper part of the box you can glue additional decorative elements, for example beads or bows. If the student already knows who to give this valentine to, you can also write the addressee on the front side of the box (by hand with a marker, glue letters cut out of colored paper, or print a name written in the chosen font on a computer).

Matchbox crafts: valentines
- Glue a small bead to the side of the moving part of the box (imitation of a handle).
- Place a confession letter in the box or fill the sliding part of the box with small chocolates.
A trinket box
For work you need 16 boxes, cut squares of cardboard, colored prints for decoration, beads (for handles). Assembly takes place in stages:
- matchboxes are glued together in 4 pieces, after drying they are installed at the ends and glued (slightly pushing forward all the „boxes”);
- the sides of the future box are pasted with cardboard, colored paper and prints with the chosen decor;
- for the base, take a square of cardboard on which colored paper is glued (on 2 sides);
- beads imitating handles are glued to the boxes;
- the workpiece is attached to the base with glue;
- the upper part of the „lid” is made similarly to the base and glued on top, adding a bright decor.
The trinket box is ready.

For a man, you can significantly increase the size of the box using 6 rows of 5 boxes.

Thanks to this, matchboxes can be useful not only in everyday life, but also become an excellent material for creating original and unusual toys for children.
Books for children
One box will make an unforgettable souvenir. You will have to prepare the pages of the book in a box format, write the text yourself or print it. The pages can be separate, intricately stitched, like a real book spine. Or folded in the form of an accordion.

Illustrations and decorations – without limits. Drawings, appliqués from paper, fabrics and natural materials, collages.


Miniature furniture
There is nothing easier than making furniture from matchboxes. Layouts attached.

At first glance, no one would have thought that these picturesque boxes consist of matchboxes. But it really is! Imagination, a little patience – and a stunning functional addition is in front of you.


Birdhouses
A craft made from several matchboxes can serve as an educational game in natural history or the world around us lessons:
- Print an A4 sheet, dividing it into several rectangles with a size equal to the size of a matchbox. Each rectangle should contain an image of a birdhouse, feeder or cage, unlike other birdhouses drawn next to it. These photos can be printed or drawn by hand.


- Print an A4 sheet, dividing it into several rectangles with a size equal to the size of a matchbox. Each rectangle should contain a picture of a bird, and not others drawn next to it. It is recommended to print photos of birds so as not to confuse the student, encouraging him to identify the bird using a schematically drawn image.
- Paint the matchbox any color or cover it with colored paper on all sides.
- Cut both A4 sheets into rectangles.
- Glue the rectangle with the birdhouse on one side of the matchbox.
- Glue the rectangle with the image of a bird to the bottom of the sliding part of the box.
- The finished material can be used in various games. For example, invite students to recognize the names of birds „living” in matchboxes or train children’s memory by asking them to remember which bird is in which birdhouse.
DIY road transport
If girls will be delighted by a doll chest of drawers with flowers, then boys will love cars, trucks and buses. Making cars from matchboxes is easy to do.
In fact, cool crafts are obtained even in relation to cars and other equipment. We will now consider the simplest options.

Our vehicle will be made in three parts. First cover them with colored paper or paint them with several layers of gouache.

Glue the two lower boxes end to end, getting a kind of long train.

Glue the remaining box onto the resulting base.
Windows can be drawn with a marker or cut out of white paper. You can do the same with the wheels, but we advise making them from a sheet of cardboard.
The wheels can also be made from buttons.

As axles for the wheels you need to take a pair of wooden toothpicks. Make the wheels themselves from plastic caps or champagne corks. Coloring options vary
Special vehicles
From this wonderful material you can make various cars. For example, an ambulance, a fire truck, a bus, a taxi, a traffic police car.

With such crafts you can participate in various competitions.

Military equipment
Boys will especially like this craft tank made from matchboxes.


Like any military equipment, it should be dark green. Therefore, we advise using several layers of gouache. For realism, you can additionally apply camouflage spots.

Next, by analogy with the car, make the tank body.

Cut the tracks out of cardboard, painting the appropriate mechanics on it, or use several small buttons glued one after another.

Take out a small cork from under the bottle and paint it in the same color as the equipment. Then fix it at the very top – the turret is ready.

The cannon can be made from a drinking straw, making a hole of the appropriate size in the upper box.

In fact, boxes are the most successful solution when modeling equipment. Due to their angularity, thanks to the ingenuity of the boxes, it is easy to get pickups, trucks, fire trucks, ambulances and so on.

In turn, girls can make themselves a dollhouse in a shoe package, with furniture from boxes. We only need your possible help in printing the necessary interior.

Educational games from matchboxes
Games for child development can be made on the basis of matchboxes.
It can be a game of associations, learning letters and numbers, and so on. Create thematic pictures: who lives where; who eats what?


Alphabet for children


Puzzles
Another interesting idea is colorful puzzles from matchboxes. Take a drawing of the future puzzle, lean it against a canvas of boxes, mark the contours along their perimeter with a pencil, and then cut it out. Alternatively, put together a puzzle from old photographs – a great souvenir!

Toys for children


Animals
Original animals from matchboxes are made simply:
- For the silhouette of a dog, use 1 pc. for the head and 1.5 pcs. for the body. The workpiece is pasted with colored paper matched to the color of the animal, pre-cut ears, paws, tail are added, and the muzzle is made.
- The elephant consists of 9 boxes laid horizontally in three rows. For the legs you will need 2 more pieces. Further work is similar to point 1.
- The cat consists of 2 elements, gluing them with the letter T. Next, as in paragraph 1.
You can also make a horse, a zebra, a Cheburashka and many other animals. A simple monkey made of 2 boxes will look surprised with an open mouth if the inner element of the box is slightly pushed out (5 mm). The edges covered with red „lips” will „enliven” the toy.


Holiday crafts


Photos of matchbox crafts


Videos about match crafts
Matchbox crafts – 5 interesting ideas:
Simple shapes
Crafts from matches and plasticine can be flat or voluminous. Choose any shape and attach its body with bright balls of plasticine.

In this way you can assemble a simple house, a little man, a pyramid, any animals from matches. Look at the photo to understand the principle of assembly and get inspired by ideas. You can easily repeat them.
Each of these shapes can be placed vertically. If you need a match craft for kindergarten or elementary school, we advise you to make a house, a person and a dog. Place them on a piece of cardboard – you will get a great composition!
Christmas tree from matches
For the New Year 2022, you can create a beautiful Christmas tree from matches with your own hands. You can place such a decoration in any room of your house and it will look great everywhere. And if the finished craft is also beautifully decorated, it will be doubly attractive and unusual.
This will require:
- Matches;
- Paper;
- Glue;
- Green paint;
- A brush.

Progress:
- The cone must be made of paper, which should be placed on a base, for example on cardboard or in a suitable container.
- Next, matches are glued to this part so that there are no gaps in the paper. The resulting handmade craft for the New Year 2020 should be repainted green. A star is ideal for the top. In a similar way, observing the work in stages, you can make another holiday decoration.
Video: master classes on making a Christmas tree
Christmas star
In kindergarten, you can organize an interesting creative task using simple materials – matches. The lesson will be simple, but it will bring a lot of pleasure, because the children will create amazing creations for the New Year 2022 with their own hands, developing thinking and finger motor skills. The crafts can be so diverse that some of them – the best and most accurate works – will be presented at the exhibition. So let’s see what can come of it.
This will require:
- Matches;
- Glue;
- Threads.

Progress:
- Three matches must be glued together, stacked one on top of the other. Such parts must be made in 10 pieces.
- Next, you need to form a star from them and glue all the sides. It will be more beautiful if you use colored materials for this. A handmade craft for the New Year 2020 can be hung on a Christmas tree or anywhere else, after tying a thread to it.
Video: a master class on creating a star from matches
Christmas tree decoration
From ordinary materials with the help of matches, wonderful decorations for the New Year 2022 are obtained with your own hands. In addition, you can fantasize and create crafts as you like.
This will require:
- Matches with colored tips;
- Foam balls;
- threads;
- A needle.

Progress:
- To make a Christmas tree toy, you need to buy a foam ball. It is necessary to evenly distribute our handy wooden material with colored tips in it.
- You need to glue the cord on top. A simple and so pleasant match craft for the New Year 2020 with your own hands is done in a short time.
Video: master classes on making a ball for the Christmas tree
Cubes – Christmas tree toys
Handmade products from matches, both white and repainted in any colors, can become cool crafts. From this improvised material you can create cubes or other figures, which will later be useful as a Christmas tree decoration for the New Year 2022.
This will require:
- Matches;
- Acrylic paint;
- Szczotka;
- Glue;
- a ribbon.

Progress:
- Ordinary instructions for creating a craft with your own hands are elementary, but unusual products are obtained. Even after going through many stores, we will not find such a decoration anywhere. The matches should be glued with a small amount of glue. You will have to make 6 small squares, about 5 by 5 cm.
- Next, they need to be repainted in any color and, if necessary, decorated. All parts must be glued together, and you will get a beautiful cube. If you glue a ribbon to it, the Christmas tree toy for the New Year 2020 is ready.
Video: a master class on making a cube from matches
Snowflake from matches
Making snowflakes is one of their favorite activities for children. They work great when creating with your own hands, not only from paper, foil and felt. From matches you can make a beautiful and durable craft in the form of a snowflake, and such a decoration will look no less beautiful on the Christmas tree for the New Year 2022.
This will require:
- Matches;
- Cardboard;
- Glue;
- Dye;
- A brush.

Progress:
- For convenience, it is advisable to draw a snowflake on cardboard.
- Based on this pattern, you can beautifully lay out the wooden material, gluing the details to the surface.
- Then the handmade DIY craft made of matches for the New Year 2022 should dry, after which paint should be applied to it. If the product will hang on the tree, you need to glue a satin ribbon for this purpose. This decor will look beautiful if you make it double-sided.
This homemade product will interest both adults and their children, because it is enough to dip the matches in glue and spread them evenly on the template. We take a ruler and a pencil and draw a snowflake on cardboard, we make simple lines and sharp corners.

Cut out the template and draw the main lines on it.

This will take a lot of matches. We pour everything on the table and light one match at a time, holding it for a moment – we extinguish it. In this way we will make slightly burnt matches, thanks to which the craft will look exclusive and unusual.

We lay the first matches along the main lines, starting from the center of the snowflake.

We divide the template visually into sectors and place the matches in the direction of the initial, main ones.

At the ends of the pattern, matches need a smaller size, so we cut them off with scissors.

We apply smaller matches with burnt edges on the other side.

This is where you should finish. We wait until the glue is completely dry and decorate the room with the craft.
A house on the Christmas tree from matches

As an unusual decorative Christmas tree toy for the New Year 2020, a miniature house created with your own hands from matches can become. Such a craft will certainly take some time and skill to make, but the result will pleasantly surprise you.
For work you will need:
- matches;
- glue;
- a cord for hanging on the tree.
Manufacturing process:
- We take the required number of matches and first create a base from them, consisting of wooden parts connected to each other with glue.
- Now we begin to assemble the house itself. On the dried substrate, you need to make a „frame” of the toy figure. We make the floor of the house, fixing it with glue.
- Next we move on to the walls. We have to assemble them in turn in the area and at the same time apply glue. On one wooden part of the first wall we lay the second part of the next wall. And so on in a circle until the required height of the house is formed.
- The windows during the execution of the walls must be highlighted with a match in gray, as in the photo.
- We make the roof from two plates glued together consisting of matches. Optionally, you can create a smokehouse by gluing halves of the parts, gray side up, to the surface of the roof being built. Here is the craft we made for the New Year 2022, with our own hands.
Building a matchstick house with glue
The craft „match house” is distinguished by the greatest monotony. It is a tedious task, but the result is worth it. To make a house from matches and glue, you will need the following materials: 3-4 boxes of matches, a toothpick and glue. It is also important to find an optimal surface for this activity. For example, a small piece of cardboard for a base or ordinary plasticine works well. Pour glue into some lid or bowl to make work more convenient.

To create an original wood product, use any PVA glue. Masters recommend using glue compositions for match crafts that will be transparent after drying. So the finished craft will look spectacular.
You already know how to make matches at home with your own hands. To create a match using glue, we recommend choosing one of the types shown in the picture.


| This is the most popular for making match crafts. Safe, which allows you to use it if you plan to do crafts with a child. It is characterized by excellent wood adhesion. | Positioned as an improved PVA glue. It differs in increased adhesion and curing speed, which is effective in the construction of castles from matches. | Moment glue is specially designed for gluing wooden elements. It grabs in a few seconds. Colorless, therefore we recommend using it for match crafts, where it is important not to disturb the aesthetic appearance with traces of glue. |
- Creating the base. To do this, place two matches parallel to each other. The distance between them should be about two centimeters. It is desirable to remove the sulfur from the first two – this will help to smooth the backing a little.
- On the edges of the sticks we apply a strip of glue about a millimeter wide, after which we lay the next two sticks above. Therefore, you should get a square.
- On the same principle, we lay the matches until we reach the planned height of the house.
- You don’t have to lay a new level right away – the previous one should dry at least a little.
- Now let’s move on to building the ceiling. To do this, you need to tightly lay matches on the walls of the house, previously greased with glue.
- Once again, we apply a thin layer of glue to the upper level of the craft, thanks to which the product will become a little denser.
- Determining how to make the roof of a house is quite simple. To do this, connect two parts. The second will have to be built separately. Fold long and short sticks in turn, and to make them stronger, attach them with two more on top of all those folded.
- When both parts of the roof are ready, connect them together and lay them on the house.
If you want to visualize the whole process, we advise you to watch a video on how to make a dwelling with matches with your own hands.
Creating a matchstick house without glue
A match house can be created without the use of glue. Making your own match product without glue is quite easy. To do this, you need a house stand and a five-kopeck coin.

- We lay the matches parallel to each other.
- We take eight more and lay them on the two already lying. At the same time, the gray heads must be turned in one direction so that the craft has an aesthetic appearance.
- Then again we take eight sticks and lay them parallel on those already lying so that the heads are again set in gray in one direction.
- Between adjacent matches you need to install a gap about two millimeters thick.
- We lay four sticks in the shape of a well, turning the heads gray in different directions.
- In the same way, we build a few more rows. Six is best.
- After building all the rows, we take eight more matches and place them in the same way as the bottom row, parallel to it.
- From above, we again make a floor of six matches.
- For the stability of the structure, place a coin on it.
- Place four more sticks around the edges of the formed square.
- We also lay matches around the entire perimeter, lowering them down the house so that the heads with gray color are at the same level.
- Carefully remove the coin. To do this, you can use tweezers.
- Gently squeeze the house from all sides, thereby leveling it. We put the house upside down.
- To make the match house stable, we reinforce the walls of the structure. To do this, place a few more matches vertically on the outside, whose sulfur heads should look up.
- Then we again lay a block of matches on the outside, but they should already be horizontal.
- On the side of the resulting structure, we insert four more pieces, those of them that are set vertically, we lift them slightly and move on to the construction of the attic, on which we lay the roof.
- Now it remains only to build a prototype of the door and chimney. To do this, break the sticks in half. From those parts on which there is sulfur, we build the elements we need.
Before you start doing, we recommend watching a video on how to make a match craft without glue in the instructions:
A well for the house
A match well is one of the simplest DIY match crafts. It goes like this:
- We take four matches and create a base for the well from them, laying it out in a square. In the same way, create ten more rows.
- From the inside of the well, we attach two matches to two opposite sides on the sides, which will serve as supports for the roof.
- We increase them by gluing another pair of sticks.
- We mount the roof from two separate parts, tightly gluing the matches together.
- To the inside of both parts we glue two more cuts in a horizontal position to strengthen the roof.
- We connect both parts with glue and then with the finished frame.
- Our well is ready. To get a brighter composition, make a handle for raising and lowering the bucket with water.

It is important that all the pins are very carefully greased with glue, otherwise the structure will be fragile. Wipe off excess glue, avoiding drying. As you can see, making such a structure is easy, just arm yourself with patience and perseverance. To simplify the task, watch a video on how to make a well from matches at home step by step.
How to make a church or temple with your own hands
Creating a church is a rather complicated process. It can take about 2000 matches. To do this, follow these steps:
- It is recommended to start creating the structure from a single-layer square. When building, matches should be placed in one direction.
- The second square should be assembled so that the fragments of matches with gray color are located exclusively on top and on one side. Excess sulfur will need to be removed.
- In the first square, make another layer of vertical walls.
- Build another layer of walls. This is done so that all the sticks are directed in the same direction.
- Assemble the same square as the first, but place the sticks in a different direction.
- Place the cubes next to each other. On average, make another layer of walls. They are placed on the sides where they do not touch other squares.
- Trim the matches on each side if the cubes are not too tight.
- Connect the cubes by pushing wooden sticks into them. Clean the back wall with a blade.
- Duplicate the structure.

- Make a standard square. In this case, the sulfur should be removed from the top.
- Trim the cube. To do this, it is recommended to trim the logs.
- Trim the cube area on the board.
- Place 8 sticks in the prepared structure. They serve to attach the cube to the bar.
- Attach the parts in the prepared place.
- Make the second leg and prepare a square on the board. To get a strong fastening, the inserted matches should be pushed through. Make an arc under the middle square. Thanks to this, it will hold perfectly.
- Repeat the same steps for the second board.
- Prepare the middle board. Build 3 cubes.
- Insert the logs horizontally into the 2 outer cubes in the front. On the other side, lay them in the same way, but vertically. Smooth the structural elements so that the surface is smooth.
- Insert vertical logs into the middle square. They must be leveled. The front and rear parts are inserted horizontally.
- Attach the cubes.
- Connect the structure with the finished strips using matches.
- Make ramps. To do this, just push the sticks from the center.
- Make 4 small towers on the sides.
- Make domes from foil. You can decorate the church with crosses. The use of windows and doors is also allowed.
Wooden church
This option is not suitable for small children and novice craftsmen. Even experienced ones do not succeed the first time. But when the craft is successfully completed, it turns out to be a real work of art.

Few materials are needed:
- wooden skewers. The required diameter is 3 mm, the material is only birch, in no case bamboo;
- ice cream sticks or those used for stirring coffee;
- matches;
- toothpicks;
- bamboo napkins. Take those with the flattest sticks;
- moss.

When creating a church from wood, more than in any other case, good tools are important. You will need:
- a sharp knife (construction, with replaceable blades);
- modified PVA glue;
- a file.

In addition, you will need a source photo, preferably more than one and from different angles. Using it, you will calculate in advance the scale of the building in terms of height, length and width.

Step-by-step algorithm:
- Unpack the skewers and look at them. Curved, ugly ones, etc. should be removed immediately. About one third of the package will be thrown away. If you bought bamboo skewers, be prepared to throw away more than half.
- We unwind the bamboo napkins and clean the sticks from glue and thread residues.
- In the middle of the „logs”, notches are made about a centimeter from each edge. They are laid in a „well” so that the notch falls on the edge of the perpendicular „log”.
- Between the first and second logs, lay the floor from the elements of the former bamboo napkin.
- Work the walls all the way to the top, gluing each layer. Treat irregularities with a file.
- Form the upper part: set the boards from the napkin „house”. Lay the logs between them, fix everything with glue.
- Attach the roof boards.
- It is better to have a ready-made dome. You can make it yourself only on a lathe.
- Decorate the windows at the edges with frames from the same elements of napkins, matches or toothpicks, three in a row.
- Lay two long, narrow strips of wood along the ridge of the roof to cover the seam.

Your church is ready. Making it is an extremely time-consuming process that does not always go smoothly. Many things don’t work the first time and need to be redone. Therefore, before starting such a craft, please be patient.

If necessary, the skewers can be painted with stain before starting the craft – it is more beautiful and durable.

It is better to make all the churches with your own hands, based on photo layouts on the Internet. Therefore, before starting work, make sure what result you should get and strive for it.