
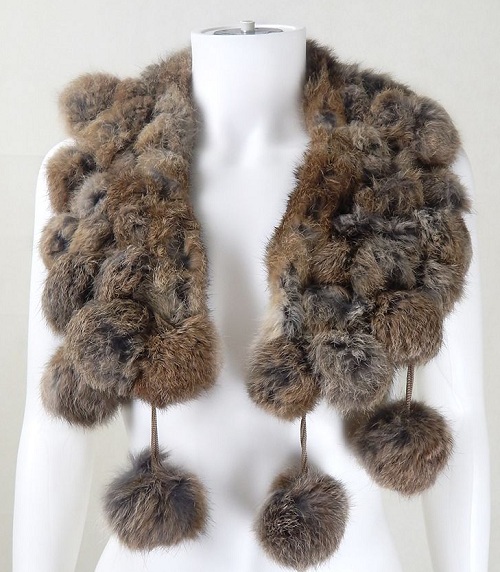

What are pompoms used for?
These fluffy balls can be used to decorate a child’s scarf, hat, mittens.
If you make several small pompoms, it is quite possible to decorate interior items with them, such as sofa pillowcases, a blanket, etc.
From a large number of such details you will get a rich and luxurious bedspread – creating it will take a lot of time and the work will be hard, but the result is worth it.
In our time, various fur decorations are very fashionable – brooches, keychains, hairpins. They look very interesting.
Advantages of making pompoms with your own hands
How to make a pompom at home? The greatest demand for buying pompoms is among people who devote their time to cheerleading. Sports stores today offer a wide range of necessary cheerleader attributes, such as pompoms. At the same time, it is worth considering the option of making pompoms with your own hands, given a number of undeniable advantages:
- buying a pompom in a sports store will require significant financial investment, and the ability to make supplies with your own hands from improvised means is a much more economical option;
- As a rule, the sports wardrobe of support group members contains several outfits, each of which requires pompoms that are stylistically and coloristically appropriate – buying several sets for each wardrobe will be very expensive, and it is not always possible to find pompoms that match the style of the outfit;
- a cheerleading team is often large, but buying so many pieces of the same kind of sports equipment for all team members can be a difficult task, and making products with your own hands using one technology can be a simple solution to this problem;
- making pompoms with your own hands is quite simple, and the process itself can become a pleasant hobby and a joint useful and exciting activity for an adult and a child.


Tips for making yarn pompoms
To create these beautiful original balls, you need to learn the intricacies of their manufacture. This will help in creating neat, fluffy products of the right shape:
- It is better to choose dense, porous yarn, thanks to which the element will be more magnificent and beautiful. The color can be in the tone of the product to be decorated or in a contrasting shade.
- Depending on the chosen manufacturing method, you will need patterns to make a ball in the shape of a circle, square or horseshoe.
- An indispensable tool in the creative process is scissors, which should be as sharp as possible. This will help give the product the perfect shape.
- Each element should be fastened with threads so that it retains its shape and the product retains its original appearance for a long time.
- If you want to create a product with a pattern or multi-colored, you need to print a photo of the pattern and focus on it while winding the yarn.
Methods of making pompoms
Making pompoms is not a troublesome business, the most important thing is that you have a special device for making pompoms from cardboard made with your own hands or plastic bought in a store. Pompoms can be made using a cardboard or plastic template. A plastic pompom maker is safer, more durable and more convenient, but you can make a cardboard pompom maker yourself instead of buying it in a craft store. It is up to you to decide which method to use to make pompoms, but we will tell you about each of them in detail.
To make such a pompom, you only need yarn and scissors.
- Wind the thread in a sufficiently thick layer around the four fingers of your left hand (see photo).
- Carefully remove the winding from your left hand.
- Holding it in the middle with your fingers, measure 20-25 cm of thread and cut it off from the ball with scissors.
- Wrap this thread several times around the middle of the winding and tie it in a knot using an air loop.
- You have two loops that need to be cut in the middle with scissors.
- Now fluff the ends of the threads to get a ball.
The more winding, the more fluffy and voluminous your ball will be.
Using forms
There is also a more complex technique that allows you to make a neat pompom of any size. As a shape, you should take 2 cardboard circles with cut-out centers.

The size of the pompom depends on the thickness of the wall of the form. The blanks are folded and wrapped with thread. Then the forms are pushed apart, the threads are pulled tightly in the middle, and the workpiece is cut between the cardboard inserts. Thanks to this, the product is more accurate.

Plastic pompom maker
It is best to get a set of plastic templates for making pompoms. They will make the work easier, since you can wind yarn around them directly from the ball. You can buy a template of the required diameter or get a set containing templates of different sizes, for example with diameters: 3.3; 4.5; 5.5 and 9 cm. To make one pompom you will need two half-templates, that is, two plastic half-circles from one set.

Cardboard holder for making pompoms
Of course, you can make round templates from cardboard, but you will have to cut off a few meters of thread to pass it through the hole in the template (a skein of yarn will not pass). To do this, thread a long thread into a darning needle and pull it through the hole in the cardboard template over and over again. You can make such a template as follows:
1. On thick cardboard, draw a circle with a compass, and in it another circle. Make two of these cardboard templates with the following diameters: 3.3 / 1.2 cm; 4.5/1.9 cm; 5.5 / 2.5 cm; 9/4 cm.
2. Carefully cut out the templates with a knife.
Read more about how to make a pompom with your own hands using a cardboard pompom maker here.
Making pompoms: how to make pompoms correctly
1. Fold both half-templates together with the connecting strips facing out.
2. Wind the yarn as evenly and tightly as possible, almost to the full height of the lintel – depending on the chosen size.

3. Wind until the whole half-pattern is full. Repeat the same using the remaining two half-templates. The ends of the threads should always be on the outside.
4. Cut the thread from the ball and connect the two pairs of half-patterns together. Using sharp tailor’s scissors, cut the threads along the outer edge between the half-patterns.

5. Pull a connecting thread of yarn of the same color through the gap between the two half-patterns and tie it tightly into a knot, preferably a double one. Carefully remove all templates.
6. Using scissors, trim the protruding threads to form a ball in the pompom. The smoother the pompom, the denser it will appear.

When making toys from pompoms, it may be necessary to make a multi-colored pompom.
Making pompoms from yarn of different colors (multi-colored pompoms)
If you wrap the templates with yarn in different colors (two, three or more threads), you will get a pompom with a melange effect. By wrapping each half-pattern with yarn in different colors or winding yarn of different colors on small sections throughout the pattern, you can make pompoms in a wide variety of colors. If you wind different colored yarn sequentially on different parts of the half-pattern – next to the thread of the first color and over the thread of the first color – you will get a colored dot or, with further winding, a stripe.
A spot or a dot can also be made by winding yarn of another color between threads of the same color.
If the instructions for pompom toys contain instructions for making pompoms, such as „a quarter in blue”, „three quarters in yellow”, „on half the surface”, „up to half the thickness”, remember that they are approximate, since everything depends on the thickness of the yarn used. For example, if you use a thicker yarn or wind it loosely, the winding instructions will no longer correspond to the size of the template. Therefore, if in doubt, first make a test winding.
Pompom on a fork
A fork is a convenient base for creating original balls. This decoration will be an excellent solution for scarves, children’s shoes and blouses. They are also used as an unusual decor on blankets and bedspreads.

To create a pompom, the thread should be wound around the tines to the desired volume and tightened with a fastening thread between the middle tines of the fork. You will get a kind of bow, the arcs of which can be cut both on the device and by removing the product from the fork.

Making half-pompoms
To make half-pompoms (for example, to make the feet or hands of pompom amigurumi toys), you need to wind the yarn on only one half-pattern.
Before cutting the yarn, pass a thin wire along the half-pattern under the threads.
1. Between the parts of the half-pattern, pass a thin wire (with a diameter of 0.25-0.4 mm) under the winding threads.
2. Twist the ends of the wire together. Along the upper edge, cut the yarn wound on the half-pattern and tie the half-pompom with a connecting thread.

How to make a tassel from pompoms
A tassel is one of the varieties of a pompom. They are used to decorate curtains, rugs, jewelry and other items. Making a tassel is not difficult at all. For work you need to take yarn, scissors and a rectangular cardboard template.

Manufacturing process:
- Wind the yarn in the required amount on the cardboard template.
- From the upper side of the workpiece, tie the threads in the middle.
- From the bottom of the template, cut the threads along the fold.
- Remove the cardboard and wrap the yarn again at a distance of 1-2 cm from the beginning of the fringe.
- Trim the ends of the tassel with scissors.
You can crochet a cord to secure the tassel.

How to easily and quickly make many small pompoms?
– We turn over a stool or a children’s table;
– We wrap 2, 3 or 4 legs with yarn (depending on how many pompoms are needed);
– With the same thread we go through the whole bundle, tying strong knots at equal distances.
– Remove the winding and cut in the middle of each segment.
The more yarn you wind, the more magnificent the pompom will be.
Removable pompom
Such a fluffy one is completely indistinguishable from an ordinary one sewn to a hat or scarf. But such products are much easier to care for. After all, it is much more convenient to simply unfasten the fur, wash the thing, and then fasten it again. There is no need to constantly sew and cut.

The only important rule here is that the button must match the pompom. It should not be visible, but it should also hold very well. Otherwise, you will simply lose the pompom on a windy day.
How to make such an accessory? Simple and easy! The pompom is created in the same way as described earlier, and the button is detachable, with one half attached to the hat and the other to the pompom.
How to make tassels with your own hands?
Needlewomen often want to decorate their products with tassels. For example, a scarf, jacket, bag, hat …
How to quickly and easily make a tassel?
– We lay out several pieces of thread.
– We tie it in the middle with the same thread.
– Fold it in half and, stepping back 1-2 cm, make several turns, securing it tightly.
– Hide the tip inside the tassel.

If you need to make a large tassel, lay out many layers of thread. If you need a long tassel, cut long pieces of thread, short – small.
The second way concerns cardboard:
– Place the thread across the template.
– Start winding perpendicular to the laid yarn.
– When you finish winding, tie the yarn with the thread laid across.
– Step back 1-2 cm and pull tight.
– If the tips are not even, we trim them.

Workshops on making fur pompoms – video
Video master class lessons
We offer a selection of videos with master class lessons that will show you how to quickly make pompoms from yarn yourself.
- In this video tutorial you will learn how to make a large and voluminous pompom from yarn.
- If you don’t know how to make a beautiful yarn pompom for a hat, watch this short video.
- A video on how to make yarn pompoms in five different ways.
- In this video tutorial you will learn another way to create a voluminous pompom.
- A video tutorial on how to quickly make a pompom with one hand.
- A video on how to make a pompom from a ready-made plastic fork-shaped template.
- If you have already learned how to make pompoms in different ways, we offer you a master class on making a blanket from them.
- And this video shows an example of weaving a rug from multi-colored pompoms, which can decorate a children’s bedroom, bathroom and living room.
- This master class will not leave anyone indifferent, because thanks to it you will learn how to make bright and original pompoms in the form of fruits and berries.
- In this video you will learn how to shape a pompom into a koala, which small children will appreciate.
If you like knitting, we draw your attention to two more video tutorials on knitting – knitted products – that will be useful to you:
- In this video you will learn a knitting pattern – knitted bags-.
We would like to share with you one more useful piece of information about alpaca wool yarn. By the way, pompoms from it turn out especially beautiful and fluffy.
We hope that these skills will definitely come in handy when creating knitwear. And if you show your imagination, you can make very creative things from pompoms. Perhaps you know other ways to create pompoms, then share them in the comments.
How to quickly make pompoms from yarn
Needlewomen know many ways to quickly create beautiful pompoms to decorate yarn products or other things, giving them originality and uniqueness. Thanks to the simplicity of the process and the ability to use available tools, even a teenager can make a fluffy ball. If necessary, you can easily create a bright, multi-colored pompom that will add sophistication to things.
Fruit
Fruit pompoms can be used as toys for children or to decorate children’s clothing. The level of complexity of production is higher than in the case of single-color products.
How to make a pompom from yarn to get fluffy fruits is given below. For work you will need sharp scissors, yarn in the color of the fruit, a large needle, high-density cardboard.
It is necessary to cut out a shape resembling horseshoes from cardboard patterns. Further, depending on the fruit, you need to wind the threads in the order described below.
Strawberry
Progress:
- Wind the red yarn in the middle of the horseshoe.
- Wind white yarn on both sides over the red.
- Repeat this process 2 times.
- Wind the red yarn on top.
- To make a tail, wind a green thread to the left of the red one.
- Using a large needle with a thread threaded through it, tie a knot on the workpiece, pulling the needle through the wound yarn.
- Cut the threads on one side. Tighten the knot tighter.
- Use scissors to shape the pompom into a strawberry.
Kiwi
Sequencing:
- Wind white yarn in several layers on the cardboard pattern.
- Wind black yarn in several places on top.

- Wrap the white-and-black yarn with green yarn.
- To get half a kiwi, wind green yarn, and also the remaining edges of the cardboard template with brown yarn.
- To create the second half of the kiwi, wrap the entire cardboard template with brown yarn.
- Fold the 2 halves of the blanks and cut.
- Use scissors to shape the product into a kiwi.
- When cutting with scissors, do not cut the thread holding the fruit in the middle.
Watermelon
Description:
- Wind pink yarn around the workpiece, on top – a little black yarn.
- Wind the second same blank with green threads in two shades: dark and light. Wind the white thread on top.
- Apply pink threads to the white yarn.
- Connect the two winding templates together, tie and cut with scissors.
- Use scissors to shape the pompom until it looks like a slice of watermelon.
Lemon
How to make a yarn pompom in the shape of a lemon:
- For the first half of the lemon, wrap white yarn around the workpiece.

- Wind the yellow yarn on top, leaving a small piece of white yarn in the middle unwound.
- Wind the middle yarn with a white pattern.
- Wind a layer of yellow yarn on top of a smaller width than the previous yellow layer.
- Again a layer of white yarn.
- The last step will be winding the yellow yarn.
- To create the second half of the lemon, apply only yellow yarn to the template.
- Tie the 2 patterns and cut.
- Straighten the shape with scissors, giving the pompom the look of a lemon.
Cute little things made from fur pompoms
Of course, the imagination of fashionistas could not stop at one use of such a cute little thing as a fur pompom. And now we see:
- A scarf with fur pompoms is at the height of fashion today.
- A brooch with a pompom. This originality will enliven the most boring outfit.
- A pompom with a keychain on a bag. It not only decorates the bag, but also has a calming effect on the owner when she strokes it.

Such a handbag will definitely attract the attention of its owner.
- A tie with a pompom, a manicure with a pompom, earrings with a pompom … In general, this jewelry has penetrated everywhere today.

Well, isn’t it cute – pompoms on nails?
A fur pompom makes a hat very elegant. The bigger and thicker the pompom, the more beautiful the hat looks. The cost of a good pompom can be several times higher than the cost of the hat itself. Therefore, you can try to make a fur pompom with your own hands. This will require pieces of fur, which can be an old collar or even a fur coat. You need to be careful not to damage the fur, cut out a circle with a razor or a utility knife. Run stitches around the edge with a strong thread. Place a piece of polyester padding in the middle. Now you need to carefully pull the edges of the skin by pulling the thread. If necessary, add more polyester padding. We tie the ends of the thread, with the same thread the pompom can be sewn to the product.
We take a piece of fur – the flesh with the pile. We cut a circle along the flesh with a diameter of about ten centimeters, it can be smaller, it all depends on the size of the pompom you intend to „present”. You make a soft filler (it can be a piece of foam rubber), wrap it with the flesh inside and fold it in one place. It turns out that the fur sticks out of the ball in all directions.
Everything is very simple. Cut a circle out of paper, trace it on the skin, cut with a blade along the drawn contour. Sew the edge with not too small stitches, stepping back 5-6 mm, and tighten. Slide the circle and again half a circle so that the ends of the threads are on opposite sides. You can put a piece of polyester lining inside to keep the pompom in shape. Pull the thread tails, tie tightly and that’s it. Done.
So the pompom is made of fluffy fur and attached to your hat. You are satisfied with the results of the work done. There is only one thing left to consider – when putting on a hat with a pompom, do not forget about a smile and a friendly expression. A pompom on a hat and a gloomy, angry face are incompatible things!
Attaching the pompom
- We thread one end of the thread (or ribbon) into the eye of the needle. We pierce the crown on the hat and pull the thread inside.
- In the same way, we pass the other end of the thread inside.
- We pull the pompom tightly to the crown (this is important, otherwise it will hang ugly on the hat) and tie a bow. If you want, you can first make a knot and then a bow.
Thanks to this method of attaching the pompom, it can be easily removed to wash the hat or change the pompom to another. You can, using this thread, simply sew the pompom to the hat.
Some people attach the pompom to the hat with a button. In this case, it is important to choose the right size of the button so that it does not stick out from under the pompom and at the same time holds it tightly. When you pick up the button, you will have to sew one half to the hat and the other to the pompom.
Tulle pompoms

For production you will need:
- tulle strips from 7 to 15 cm wide;
- cardboard for the template;
- a piece of ribbon, rope.
How to make a pompom from tulle strips or threads with your own hands
We decide on the required diameter of the future decoration. As a template, we will use an improvised item of exactly this diameter.
We trace the outer diameter of the template.

If you know how you can make a pompom with your own hands from yarn, the further process will be very easy for you to understand.
Mark the middle of the piece and cut out a small round hole. Using this template, we cut out the same second one.
It can be done even easier by drawing two circles from one center with a compass.
We make a cord ring in several turns of thread and place it on one of the templates concentrically with the smaller cut circle.

We close the thread with the second pattern. We begin to wind the tulle strip over the entire surface of the template.

We try to do it evenly, without gaps.

After finishing the winding, we make a cut along the entire line of the circle.

Gently pull the ends of the cord and tighten them.

We cut out and remove the cardboard templates. Tighten the cord as much as possible. The pompom is ready.

If you plan to decorate a room with the pompoms you have made, leave a longer cord. It can be used as a fastener.
For cheerleaders, the decoration can be attached to a handle or a convenient loop can be made.
How to make cheerleader pompoms: life hack
Tips for those who need to make pompoms
How to make a pompom from threads with your own hands so that it is beautiful and even? Doing this on your own is quite easy and fast. In the process of creating a product, it is worth following a few tips:
- To make the pompom look lush and voluminous, use threads of a dense and porous texture. Yarn with natural wool fibers is best suited for this. Products made from such yarn will better retain their shape and become more voluminous and fluffy.
- To make it easier to create a template, you can purchase special rulers. Usually patterns in the form of a circle or square are used.
- Scissors must be sharpened.
- It is better to match the color of the pompom to the product you are going to decorate, or contrast it.
- If you want to create an item with a design of several colors, use a special scheme for this.
- In order for the product to retain a neat appearance for a long time, the pompom must be tightly fastened in the middle with a thread. To tie the yarn more firmly, you can use silk threads for this. They are stronger and invisible on the finished item. For greater strength, you can wet the thread several times and tie the product. You can also fix the product with a special knot – a stranglehold. This knot is very strong and can be tightened strongly.
- Pompoms are recommended to be washed only by hand at a water temperature of 30 degrees. The product is dried in a suspended form. After drying, the pompom is combed and trimmed with scissors.

Photos of sample homemade pompoms


