Scientists claim that the tradition of decorating a Christmas tree for the New Year came to us from our pagan past. There are many disputes and disputes on this score. But we, the descendants of those very pagans, by and large do not care where this tradition came from. The main thing is the warmth of the family hearth and such a bright symbol of the new branch of time. New Year is for many that point in the life span of time that so needs to be set. Mark the end and, accordingly, the beginning.
Both large and small love to dress up a green fragrant beauty Christmas tree. Agree, there is something magical about it. We could not ignore this issue and offer you a selection of ideas for making New Year’s toys for your crazy pens. We will not talk about the value of handicrafts, a lot has already been said about this on our website, in particular.

Just read the article, you will surely be interested in one of the ideas. And if one of the handicrafts offered by us takes an honorable place on your New Year’s green, or maybe not green, beauty, it will be a holiday for us.
In this article, we will talk about Christmas tree decorations that can be made from improvised means and that are beneficial to distinguish your tree from many others. So, let’s begin…

Snowmen from beer caps on the Christmas tree
The snowman is one of the traditional symbols of the New Year and, as a result, the most popular Christmas tree toy. But how often have you seen snowmen made of iron bottle caps? No? Then welcome: snowmen from lids.
What you need to create a fun snowman:
- Iron caps from glass bottles (these can be found on beer and lemonade bottles in glass containers).
- Acrylic paints.
- Spray paint. White.
- Ribbons. Preferably not wide up to about one centimeter.
- Hot glue
- Buttons.
- Scissors.
- Brush.
- Sequins or something similar for decoration of your choice.

Preparing beer caps
Using spray paint, paint the inside of the caps white. Before painting, bottle caps should be washed, dried and laid out as tightly as possible on one plane. It is advisable to paint outdoors. The paint should cover the inner surface of the lid tightly, if necessary, repeat the painting.
 Shaping the body of a snowman
Shaping the body of a snowman
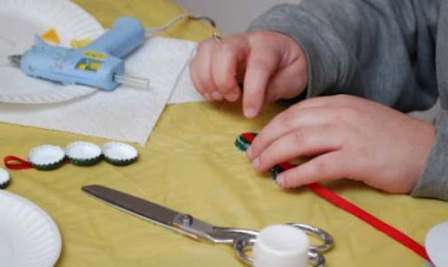
After the covers are dry, you can start assembling the bodies of the snowmen. Place three lids in a row, with the convex side facing you. Try on how much tape you need to glue all three caps together with hot melt glue. Cut off the measured length of the tape, do not forget to leave a supply of tape in order to arrange the loop for hanging.
Glue the cut off tape, as mentioned above, with hot melt glue to the lids. You can preliminarily grab the covers a little together, so that already on the tape they hold better, so to speak, add the rigidity of the structure.

We make a snowman
Take acrylic paints and paint with a thin brush the eyes, nose, mouth and buttons on the painted side of the bottle caps. If you don’t have a suitable brush, you can replace it with a toothpick. The edge of which you need to knead a little to get something like a miniature broom. After the paint dries, you can add some glitter.

Decorating a snowman
Cut off small pieces of colorful ribbons and tie them to your snowmen in the manner of scarves. In the places where you tied the scarves, glue on a bright button. How do you like the idea?
Cute penguins, crafts from incandescent bulbs
A burnt out light bulb is considered garbage and they rush to throw it away. Well, in vain. In our business, exactly what should be thrown away will ideally fulfill the role of something new. Here is an idea with funny penguins for you to consider. Such penguins will perfectly decorate the Christmas tree and will delight your pets.

So, what you need to create a cute inhabitant of polar ice floes:
1. Damaged incandescent bulbs.
2. Acrylic paints or gouache.
3. Brushes. It would be nice to prepare a few. It is good to cover large areas with large ones, and draw small details of faces with thin ones..
4. Ribbons, cords, threads or the like.
5. You can prepare hats in advance. The hat left over from the toy is suitable or you can build something like that yourself.
6. Hot melt glue.

Let’s start making Christmas tree decorations from light bulbs
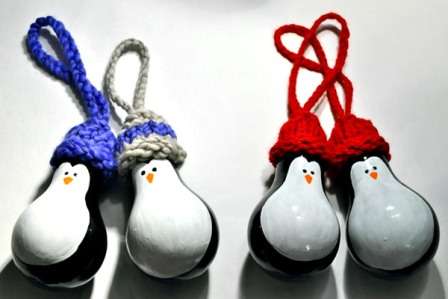
Damaged bulbs should be cleaned of dirt and degreased. Then cover with black and white paints. Do you remember the color of real penguins? Exactly. The back is black, and the belly and muzzle are white. You can make a simple and slightly complicated coloring of the pinginchik. You can simply cover the light bulb with white and black paint, or you can draw a little flippers and an arc above the eyes..
Light bulbs painted white and black must be dried. Then paint the faces. Just use a thin brush to draw eyes, nose and blush.

Tip: To make it easier to work, take a reel of duct tape or toilet paper, or something similar. Install the bottom of the light bulb into a round hole of a suitable size, it will not wobble and thus it will be easier for you to apply drawings to the surface.
After you have painted the penguins and painted their faces, you need to dress the cute ones. For this purpose, doll things are well suited. And if you wish, you can build clothes on your own. Tie unpretentious hats and scarves from leftover threads.

Okay, but let’s not forget about the hanging loop. If your penguins will not be wearing hats, then just use hot melt glue and apply the required amount to the very top of the cartridge and glue a loop from a lace or ribbon. And in the case of hats, you first need to leave a hole in them in order to thread the loop.

We put on hats, put on scarves. Scarves can be simply tied on the penguins, or they can be fixed with hot melt glue. This is at your discretion and wish..
That’s all. Cute penguins from lamps are ready. Hurry to hang them on the tree. May they please family.

Lace balls for decorating the Christmas tree
Fashion for knitted napkins is immortal. All the same, for several dozen housewives there is one who will not fail to decorate the furniture with a knitted napkin or throw light lace on the monitor, in the manner of grandmother’s decor. Yes, these are not extinct, they exist. Therefore, rummaging through your stocks or mom’s, or even grandmother’s, you can find a couple of three openwork lace napkins. It’s time to give them a second life.
The openwork ball can be applied as christmas tree decoration or as a New Year’s decor of the room. Or even leave it as a plafond. There are many applications for this product..

So, what you need to create an openwork ball:
- Lace. Leftovers of simple lace work well. Old knitted napkins.
- Inflatable ball.
- PVA glue.
- Brush.
Let’s start making a ball from a napkin
First you need to dilute PVA with water. The approximate ratio of parts is 2: 1. Glue and water must be thoroughly mixed and poured into a container with a fairly wide neck, you can even take a plate for this purpose.

Tip: do not use any other glue, especially silicate glue. He has a quality that is completely inappropriate in this matter. After drying, this glue is known to turn into a substance that vaguely resembles glass. And with a tendency to crack and turn into sand from mechanical stress. Which is absolutely inappropriate. Yes, and when it dries on a ball, it will burst. Experimentally proven.
Then, in the resulting solution, you need to soak laces and napkins.
Tip: Naturally, the material of napkins and lace should be absorbent. At least minimal.
The diluted glue can be applied to napkins and with a brush. Having previously laid them out on an oilcloth.

Now we need to inflate the balloon. Ideal if you use a simple and sturdy round ball. Determine the size yourself.
Carefully cover the inflated and balloon with napkins and lace soaked in glue. Try not to leave an empty space between the material, but do not apply it in a thick layer. After the ball is completely wrapped, you must carefully hang it and wait until the glue is completely dry and turn the napkins with lace into a kind of crust.
Next, the ball must be burst with a needle or something similar. The rest of the ball must be carefully removed. Now, for greater stability, the openwork ball can be sprinkled with hairspray. It was hairspray that showed itself perfectly in this case. Proven experimentally.
Now all that remains is to attach a loop for hanging and that’s it..

Advice: do not use this design as a candlestick (there are such ideas on the Internet). An openwork ball can easily ignite, and then the result can be spanking on the buttocks of firefighters, and not a fun pastime. Do not spoil your holiday!
Watch the video on the topic: Christmas ball made of thread
Christmas toys: warm hats
Although sometimes winter in our area is reminiscent, and spring, and deep autumn, and then again spring, in a word, any season just not winter with snow. But a warm knitted hat still remains a symbol of winter cold and snow. Use our idea and make funny warm hats as Christmas tree toys. Originally, and most importantly, practically out of trash.

So what you need:

1. Garbage. Or rather, rolls of toilet paper, cling film, or any other lightweight cardboard roll that you may be taking out of the trash can right now..

2. Remains of thread from knitting. It is desirable that they be approximately the same in texture and thickness, the latter is more important. The length of the segment can be taken from 25 centimeters.

3. Scissors.
4. Ruler.
5. A simple pencil or something with which you can make notes.
Let’s start making:
The cardboard cylinders should be marked and cut into rings, like a cucumber. Choose the width of each ring yourself. This will determine which cap lapel you want to make.

Tip: if you are planning to make wide cuffs, then the length of the threads also needs to be increased.
The threads must be folded in half and looped on the cardboard rings. They must be constantly tightly shifted to one another. The cylinder must be tied tightly.

When you are finished with the threads, you need to tuck the loose ends inside the cardboard ring, and tie them into a bundle on the back side..

Leave some loose threads about a centimeter, when you cut off the excess, they form a kind of pompom.

This will make the hat look realistic and cute. The loop for hanging can be made from the same thread with which you grabbed the top of the cap under the pompom.

Thus, when hanging, the cap will not hang evenly, and this will give asymmetry to the product, which will only benefit the appearance..

Everything. Your handmade decorations are ready. Hurry up to try them on the herringbone.

Snowflakes and plastic bottles
And again, the material for the future masterpiece is nothing more than rubbish. The lemonade bottle would have been thrown away at any other time, but not in this case. We offer you the following idea, namely a snowflake from the bottom of a plastic bottle. This craft will fit perfectly with any other Christmas tree decorations. And the snowflake is a traditional symbol for winter and New Year..

So, what do you need to create a wonderful Christmas tree decoration:
- Plastic bottles. Standard clear or blue / cyan.
- Stationery knife.
- Awl.
- Dye.
- Brushes.
- Thread or thin ribbon so that the toy can be hung.
- Sequins for decoration at your discretion.
DIY Christmas toys from plastic bottles
From the whole bottle, we are only interested in the bottom. Cut it off with a clerical knife. Make it as low as possible. Heat the awl and carefully make a hole in the cut, into which you will eventually thread the thread for hanging..

Now apply a pattern of curls or lines to the cut bottoms. It can be both complex and simple, it depends on your imagination and wishes. You can add glitter to the picture or mix it with paints. That’s all, the Christmas tree decoration is ready.

DIY stylized Christmas balls
Call the children! The proposed idea will just honestly allow you to spend interesting minutes, if not hours, together. Everyone is used to the fact that Christmas balls are round and convex. No, but this does not affect the originality and beauty of toys at all. Moreover, the manufacturing process is absolutely simple. Even a small child can handle it. It will even be better for the children to help you in the manufacturing process. Since a certain awkwardness inherent only in children, let’s call it charm, is required to stylize our jewelry.

What do you need to make incredible balls:
- Multi-colored knitting threads. Better than medium thickness.
- Wire or twigs that are easy to bend and keep their shape.
- Pliers.
- Beads with large holes.
- Fantasy.

Let’s start doing New Year’s crafts
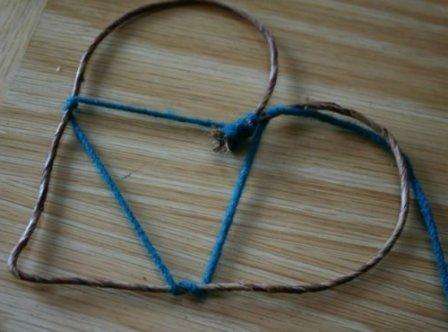
We take the wire and wrap it with a piece of dark fabric, or with thread or dark-colored paper. It is not necessary to do this carefully, it is enough that the wire is 80% hidden..

We grab the free ends with pliers and make several turns. Make sure the wire is held together and the wrapping material is secured. It turned out a kind of not quite even circle with antennae.

If you use twigs, then fasten them with a thread to keep them in shape. By doing just a few turns. And don’t forget to leave long ends for the eyelet so your balls can be hung..

By the way, the place where the wire closes in a circle can also be decorated.
Now we take multi-colored threads and wind them on a makeshift frame. We do it not tightly, but also weakly. You can use up to three colors, preferably contrasting.

On the thread that you plan to wind up last, string a few beads, if desired. Fasten the thread on the “tail” of the frame.

That’s it, your own New Year’s toys are ready. Extremely simple and at the same time extraordinary and eye-catching. Happy New Year!
