Laptop owners often face the problem of overheating their device. This is due to the fact that the outflow of hot air from the ventilation holes is bad. To solve this problem when the laptop is warming up, a laptop stand will help, which slightly raises it above the work surface. In the mobile accessory market, you can find cooling pads with built-in coolers or regular pads that are metal or plastic construction.
If you want the laptop to work longer, but at the same time it is a pity to throw large amounts of money on the stand, we recommend that you make it yourself from PVC pipes. You will make a comfortable stand with minimal costs within an hour.
Materials for making the stand:
- PVC pipes;
- marker;
- roulette;
- glue;
- PVC elbows;
- dye.

DIY laptop stand master class
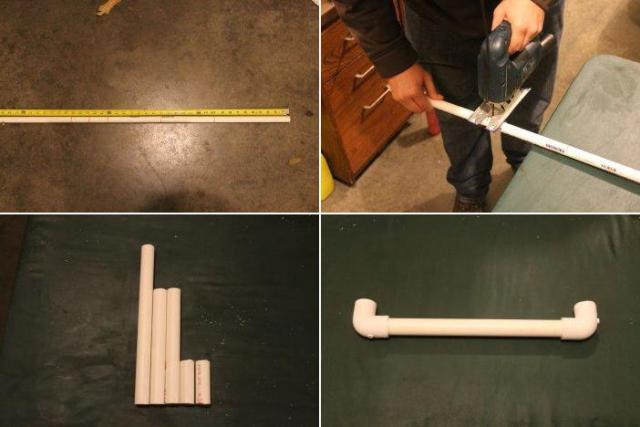
1. Take a 0.75 inch pipe and cut it into several pieces: 6 cm x 2, 16.8 cm x 2, 24 cm x 1. Take measurements of your laptop beforehand, as these dimensions may not fit some models.
 DIY laptop stand master class
2. To assemble the stand, start from the longest part of the pipe. Attach your elbows to it at both ends..
3. Take the two smallest pieces of pipe and insert into your elbows. Reattach the elbows to the free ends of these small sections, perpendicular to the base. Glue all elbows in this construction to make the stand strong..

4. On the remaining two pieces of pipe, fasten the last two elbows and connect them to the structure obtained in step 3. The last pipe sections can be twisted if necessary, then the stand will fold compactly.
 The finished structure can be painted with spray paint in a color that will be in harmony with the desk and the general interior. Experts recommend using a laptop stand not only to protect the device itself from overheating, but also to ensure that the correct posture is formed for computer owners..
If you want the stand not only to raise the laptop, but also to cool it, follow the instructions from another master class..
Materials for making the cooling pad:
- marker;
- screwdriver;
- computer fan 12 × 12 cm;
- USB plug (plug / male);
- insulating tape;
- the wire;
- binder folder;
- knife.

Master class: do-it-yourself laptop stand with cooling
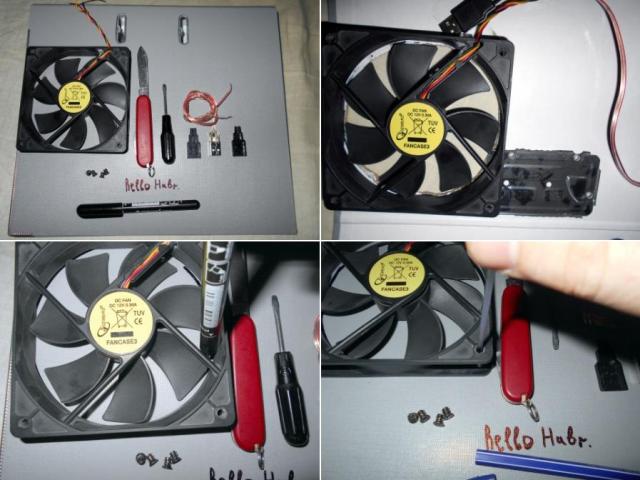
1. Choose a location where the fan will be located. It is advisable to install it on a stand in the place where the laptop (processor, video card) heats up the most. The size of the folder – the future stand allows you to place even 2 fans 12 × 12 cm.
 Master class: do-it-yourself laptop stand with cooling
2. Trace the fan along the contour on the folder with a marker, also mark the holes for the studs.

3. Cut a hole along one side and secure the fan. Install the fan so that it blows air out from under the laptop, and not vice versa.
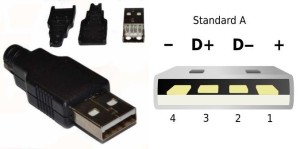
4. Now you need to connect the fan to USB. To do this, you have to figure out what the wires mean: yellow – speed monitoring, you do not need to touch it; red – plus; black – minus.

5. After connecting the wires, do not forget about the insulation.

6. You can maintain the angle of inclination of the stand using a matchbox, which is glued to the folder.

The cooling pad is ready! You can take an idea from this master class and improve it, for example, instead of a folder, use chipboard or some other material..
Watch the video: Do-it-yourself laptop cooling
The main difference between a laptop cooling pad and a regular one is the presence of a fan that blows out warm air and prevents the device from overheating. Stands for laptops – a useful computer handicraft for those who like to watch movies or view pages in social networks while lying on the couch
